Sparkov Deployment - AWS
Team AlixPartners - 10/27/2015 - Brandon Harris
Prerequisites
-
Amazon Web Services Account
-
Key Pair .PEM files (for SSH access to AWS environment) (Avoid using spaces
in the file / keypair name, and it should be downloaded and saved into your \~/.ssh/ directory).
-
Internet connectivity
Useful Links / References
Cloning the BitBucket Repository from the Command Line
First we'll need to make sure we're working with the latest version of git. Head over to http://git-scm.com/download/mac and download the latest .DMG installer and run through the setup process.
Once you've installed Git, open up a terminal / shell and type the following (replacing with your BitBucket user name). Please note that I've now included the transaction data set with the sparkov repository and it's ~350MB in size, so this may take some time to fully download. We'll also use the tilde (~) alias quite a bit in this process. If you're unfamiliar with this, ~ represents the directory /home/yourusername, so typing "cd ~" and hitting enter will take you to your home directory.
cd ~
git clone https://<yourbitbucketusername>@bitbucket.org/nameBrandon/sparkov.git
This will create a folder called 'sparkov' in your home directory with the latest project files. If there are further updates to the code and you wish to synchronize your local folder with the latest updates from the BitBucket website you can issue the following commands.
cd ~/sparkov
git pull
Starting up the AWS Elastic MapReduce (EMR) Cluster
-
Log into AWS with your account.
-
Under ‘Analytics’, choose ‘EMR - Managed Hadoop Framework’.
-
Click on ‘Create Cluster’
-
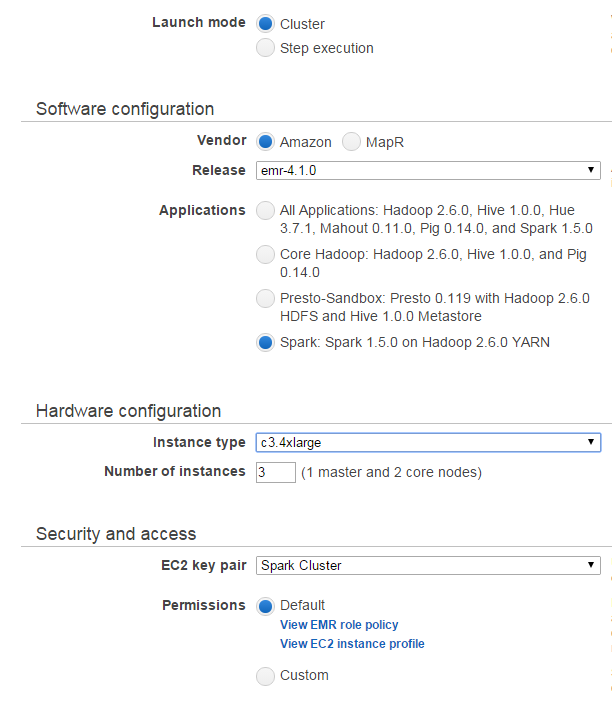
Select the cluster options. See below for recommended configuration. Note that your EC2 key pair will be named differently (whatever you created saved it as). Mine happens to be called ‘Spark Cluster’
-
Wait for cluster provisioning. This can take 15-20 minutes depending on availability and configuration chosen. If you have not yet downloaded the Sparkov code or the sample data set, this would be a good time to do so. You may also want to compress the customer / transaction data set into a .zip / tar.gz file for faster transfer to AWS, as we will need to put the files on the cluster HDFS.
-
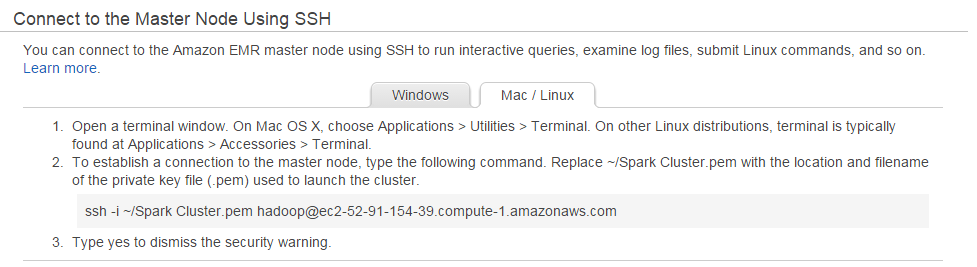
Obtain your “Master Public DNS” name for the name node. To do this, click on
“SSH” on the “Cluster Details” page (Master Public DNS: ec2-xx-xx-xxx-xx.whatever.amazonaws.con SSH)

-
Choose Mac/Linux (or Windows, if you’re using Windows).
-
Copy the ‘ssh -i’ line from the prompt and paste into a terminal shell to
connect to your cluster. Save this line in a text editor, as we’ll refer to it frequently.
-
Once connected, we’ll create a working directory for our files, then exit and transfer our data to the cluster. Execute the command(s) below on the EMR cluster.
ssh -i ~/.ssh/SparkCluster.pem hadoop@ec2-52-91-154-39.compute-1.amazonaws.com
mkdir /home/hadoop/temp_files
exit
Copying our data to the cluster
Now let’s transfer our project files to the temp_files directory we created on our cluster's name node.
We’ll do this using ‘scp’, or secure copy, from the terminal window. Replace the hadoop@ec2-... connection line below with the one for your environment (saved off in a text editor from step 8). Leave the portion after (and including the colon), as we want to place the files in /home/hadoop/temp_files.
scp -i ~/.ssh/SparkCluster.pem ~/sparkov/*.* hadoop@ec2-52-91-154-39.compute-1.amazonaws.com:/home/hadoop/temp_files
Next we'll reconnect to the Amazon cluster in order to pre-process our data and place our data files on HDFS. The fraud_not_fraud_splitter.sh script takes the transaction data files and creates two sorted subsets of files, one set for sorted fraudulent transactions (prefixed with an f_) and one set for sorted legitimate transactions (prefixed with an l_).
Please note that it may take a minute or two for the fraud_not_fraud splitter script to finish executing. This is normal and expected behavior. Also, this documentation was written with the transaction data being stored in a file called Transaction_Data-2015-10-27.zip. If you are referring to these directions later on, this file name may have changed. Check BitBucket or your ~/sparkov/ directory for the correct .zip file name.
ssh -i ~/.ssh/SparkCluster.pem hadoop@ec2-52-91-154-39.compute-1.amazonaws.com

cd temp_files

unzip Transaction_Data-2015-10-27.zip -d /mnt1

rm Transaction_Data-2015-10-27.zip

chmod +x fraud_not_fraud_splitter.sh

cp fraud_not_fraud_splitter.sh /mnt1/Data

cd /mnt1/Data

./fraud_not_fraud_splitter.sh

hadoop fs -mkdir /tmp/files/

hadoop fs -put l_*.csv /tmp/files
Install Redis on AWS name node
While logged on to the AWS name node, perform the following steps.
sudo yum -y update

sudo ln -sf /usr/share/zoneinfo/America/Chicago \
/etc/localtime

sudo yum -y install gcc make
cd /tmp

wget http://download.redis.io/releases/redis-3.0.5.tar.gz
tar xzf redis-3.0.5.tar.gz
cd redis-3.0.5
make

sudo mkdir /etc/redis
sudo mkdir /var/lib/redis
sudo cp src/redis-server src/redis-cli /usr/local/bin/
sudo cp redis.conf /etc/redis/
Once these steps are completed, execute the following command and take note of /
copy the internal IP address of the name node (eth0 - inet addr:
172.xxx.xxx.xxx). Please keep this address your Amazon external name node DNS
information, we will refer to this IP address frequently in subsequent steps.
ifconfig
Now we need to edit the redis.conf file and make a few changes. We do this using
the ‘nano’ editor. Execute the following command to being editing the redis.conf
file, and make the changes listed below.
sudo nano /etc/redis/redis.conf
Changes to make.. (note that CTRL+W lets you search for a string if needed).
 [..]
  daemonize yes
  [..]

  [..]
  bind 127.0.0.1 #replace 127.0.0.1 with internal eth0 IP address and remove leading # sign
  [..]

  [..]
  dir /var/lib/redis  #replace dir ./
  [..]
Save the file by pressing CTRL-X to exit, and the “Y” when prompted to save the
file.
Execute the following commands to finish the redis setup / configuration.
cd /tmp
wget https://raw.github.com/saxenap/install-redis-amazon-linux-centos/master/redis-server

sudo mv redis-server /etc/init.d
sudo chmod 755 /etc/init.d/redis-server
sudo chkconfig --add redis-server
sudo chkconfig --level 345 redis-server on

sudo service redis-server start
If you see the following output, redis is installed and configured correctly.
Starting redis-server: [ OK ]
Upgrading Python on each node in the cluster
Unfortunately the AMI (Amazon Machine Image) used for the EMR deployments are a
bit dated and ship with Python 2.6.x. There have been significant code changes
in Python since then, including functionality we need for the Markov chain
process. In order to use this functionality we need to upgrade Python on the
cluster. We cannot just upgrade one node or else the individual nodes will not
match, so we need to obtain the internal IP addresses for each node in the
cluster, connect to them individually and perform a Python upgrade by hand.
First we need to obtain the IP addresses for every node in the cluster. We can
do this via Hadoop, with the below command.
hadoop dfsadmin -report | grep ^Name | cut -f2 -d: | cut -f2 -d' '
You should see output similar to below
DEPRECATED: Use of this script to execute hdfs command is deprecated.
Instead use the hdfs command for it.

172.31.39.12
172.31.39.14
These are the data nodes in your Hadoop / Spark cluster (you are connected to
the master / name node already). Take note of these IP addresses, as we are
going to walk through the process of upgrading Python on the name node, and then
you’ll need to SSH to each data node and repeat the same process.
First we need to disconnect from AWS and issue a few commands on our local PC.
To disconnect from the current SSH connection, we just do:
exit
We need to our AWS key pair / .pem file to our local SSH agent.
ssh-add ~/.ssh/SparkCluster.pem
Now we’ll re-connect to AWS (again, replace the below connection information
with your AWS DNS information).
ssh -A hadoop@ec2-52-91-154-39.compute-1.amazonaws.com
Python Upgrade Steps
Please execute the following steps to upgrade Python on the name node. You can
re-use the same instructions for each data node, though the output may vary
slightly depending on the data node configurations.
sudo yum install make automake gcc gcc-c++ kernel-devel git-core -y
sudo yum install python27-devel -y
sudo rm /usr/bin/python
sudo ln -s /usr/bin/python2.7 /usr/bin/python
sudo cp /usr/bin/yum /usr/bin/_yum_before_27
sudo sed -i s/python/python2.6/g /usr/bin/yum
sudo sed -i s/python2.6/python2.6/g /usr/bin/yum
At this point we should make sure python is reporting the correct versions.
python -V
It should output a version number higher than 2.7.0, which means our upgrade was
successful.
Now we need to finish up with a few more commands
sudo curl -o /tmp/ez_setup.py https://bootstrap.pypa.io/ez_setup.py
sudo /usr/bin/python27 /tmp/ez_setup.py
sudo /usr/bin/easy_install-2.7 pip
This configures ‘pip’, which is the python command line package installer
(similar to what install.packages() does for R).
Name Node Steps (perform on master / name node only)
We need to install the redis package as well as some other libraries for the
name node only. You do not need to do this for each data node (we are sending
the library to each data node in our Sparkov_AWS.py code).
sudo /usr/bin/pip2.7 install redis
sudo /usr/bin/pip-2.7 install itertoolz
sudo /usr/bin/pip-2.7 install toolz
sudo git clone https://github.com/mumrah/kafka-python.git
sudo /usr/bin/pip-2.7 install ./kafka-python
Python Upgrade on the Data Node(s)
We need to repeat the python upgrade steps for each data node in our cluster.
The steps remain the same as above, but in order to connect to our data nodes we
can execute the following command (be sure to replace the IP address listed
below with the IP addresses we obtained via the hadoop dfsadmin command in the
section labeled ‘Upgrading Python on each node in the cluster’).
ssh hadoop@172.31.39.12
This should log you in automatically to the data node. Repeat the above steps to
ugprade python. Once complete, connect to each subsequent data node IP address
and upgrade python until all data nodes are upgraded. You should be able to
paste the entire block of text, rather than each line individually. Remember
to close each SSH connection (use the exit command) after upgrading and return
to the name node before connecting to the next data node.
Installing Kafka
We’ll perform the following steps to install Kafka on our name node (you could
install this on a data node as well if needed, or any additional Amazon EC2
instance, though firewall changes may be required in that case).
cd /opt
sudo wget http://apache.mirrors.tds.net//kafka/0.8.2.0/kafka_2.10-0.8.2.0.tgz
sudo tar xvf kafka_2.10-0.8.2.0.tgz
sudo ln -s kafka_2.10-0.8.2.0 kafka
Next, we’ll need to modify our Kafka listener code for our cluster
configuration.
nano ~/temp_files/transaction_listener_AWS.py
Locations to change have been marked with ‘AWS’, so please use CTRL-W to search
for that string. We’ll make the following replacements. Please do not include
the ‘\<’ or ‘>’ in your replacements, they are just indicators of where your
replacement should be in the lines of text.
redis_ip = '<your internal name node IP address>'

consumer = KafkaConsumer('cc_stream_tx',bootstrap_servers=['<your internal name node IP address>:9092'])
Modifying the Sparkov code to run on the AWS cluster.
At this point our cluster should be fully updated and configured to run our
Markov chain code, however, we need to modify the code to utilize the cluster.
If you are not connected to the name node in your AWS cluster, connect now.
Navigate to the temp_files directory we stored all of our files in, so that we
can begin to edit our code.
cd /home/hadoop/temp_files
Now let’s start nano up so we can make our changes.
nano Sparkov_AWS.py
All relevant lines to be edited have been marked with ‘AWS’, so let’s search for
‘AWS’ by using the CTRL-W feature in nano. Note that there are additional lines marked with 'AWS', for now only modify the redis_ip = 3.xxx.xx.xx lines. Also when searching via CTRL-W, the screen may wrap around lines that are too long to display in the console. You can use the left arrow on your keyboard to get back to the 'other side' of the screen.
There are ~4 occurrences of the redis_ip line. Each must be modified to point
to your name node IP address. Make sure that you leave the tick-marks around the
ip address when replacing the addresses, and that you only replace lines similar
to below (redis_ip is a variable used often, you only want to replace the
variable assignment (redis_ip = xxx), not the reference to redis_ip in the
code). Note that this should be your eth0 inet addr like 172.xxx.xxx.xxx, not
your external DNS information.
redis_ip = '<your name node IP address>'
We’ll need to adjust one more value besides the redis_ip lines, and this is the memory reserved for each executor. The amount of memory available is determined by your instance size/type when creating your cluster. We chose c3.4xlarge, which have 30GB of
memory each. We need to keep in mind that these are fully running Hadoop
clusters, and as such, memory must be reserved for Hadoop-related processes as
well as the host operating system, so we’ll use 20GB of memory for our
executors. If you start up a smaller cluster (meaning using an instance type
lower than c3.4xlarge, please refer to the following link to determine your
memory size for each cluster node Amazon Instance
Types.
Search for the following line. (Make sure the line you edit has 24g in it!)
conf.set("spark.executor.memory", "24g")
and replace it with (”24g” -> “20g”).
conf.set("spark.executor.memory", "20g")
All other AWS specific lines have been pre-configured, but are still marked with
“AWS” for future reference. Once you have changed all “redis_ip = “ lines to
point to your name node IP address and modified the spark.executor.memory line,
use CTRL-X to exit, and enter “Y” to save the file when prompted.
Executing the Sparkov code
When Spark executes code, there is quite a lot of DEBUG output. Some of it is
useful, but mostly it gets in our way. In order to reduce the volume of output,
we’ll modify the Spark logging configuration file to show us only warnings and
errors.
sudo nano /etc/spark/conf/log4j.properties
Change the following line:
log4j.rootCategory=INFO,console
to match below (replacing INFO with WARN).
log4j.rootCategory=WARN,console
use CTRL-X to exit, pressing ‘Y’ to save the file when prompted.
In order to submit the Spark code for processing across the cluster
(distributed), we use the spark-submit command. Executing the following command
should (if all steps were completed successfully) launch the Markov trainer and
generate Markov models for each customer as well as each profile.
spark-submit --master yarn-client /home/hadoop/temp_files/Sparkov_AWS.py
The code may take several minutes to run, and the duration is dependent on the
processing power of your cluster. A 3 instance c3.4xlarge cluster takes about 8
minutes. I have tested it on a c3.4xlarge cluster with 5 nodes, and it takes
just under 4 minutes to complete. You may see Hive related warnings about
ObjectStore, etc.. These can be ignored.
Testing the Sparkov Code
We’ll invoke the pySpark shell to make sure all went well and that data was
stored. Before doing so, we’ll need two peices of information from our test
data. Open the customers.csv (either on your local PC or on the cluster) and
save a customer ID (2nd field, cc_num) and a profile name.
nano /home/hadoop/temp_files/customers.csv
For example, the first customer had a cc_num of
3112476941854359
and paging over to the end of the line (tip, rather than arrowing over to the
right, you can move to the second line and then go left), I see a customer
profile called.. (you can pick any profile, it doesn’t need to be related to the
customer ID number above).
male_30_40_smaller_cities.json
Save these two pieces of information in a text editor on your local PC. Hit
CTRL-X to exit, saying ‘N’ when prompted to save the file.
Now we’ll use the interactive pySpark shell to execute some code to test our
markov data. To load the shell, type the following and hit enter. Wait until you
see the “Spark” ascii logo before continuing.
pyspark
Type or past the following code below into the pySpark shell.
import redis
import cPickle

redis_ip = '172.31.41.83' ## Replace this with your name node IP address
redis_port = 6379
r = redis.StrictRedis(host=redis_ip, port=redis_port, db=0)
r_full = redis.StrictRedis(host=redis_ip, port=redis_port, db=1)
r_tsm = redis.StrictRedis(host=redis_ip, port=redis_port, db=2)
r_agg = redis.StrictRedis(host=redis_ip, port=redis_port, db=3)

user_ccnum = '4532766006629' ## Replace this with your cc_num obtained above.
profile = 'male_30_40_smaller_cities.json' ##Replace with your profile above.

# Execute these print statements one at a time

print cPickle.loads(r_tsm.get(user_ccnum))

# Pause before executing the second line to ensure the fist print statement
# returned data.

print cPickle.loads(r_tsm.get(profile))
If all is well, you should see arrays of floating point numbers for each print
statement. These are the markov models / transition state matrices for the
associated user and profile that were generated by the Sparkov code.
Testing the Kafka Listener Code
In order to test the Kafka listener, we’ll need a few sample transactions to
send. I suggest opening up one of the transaction .csv files on your local
laptop and copying the last 2 or 3 transactions and pasting them into a text
editor for reference.
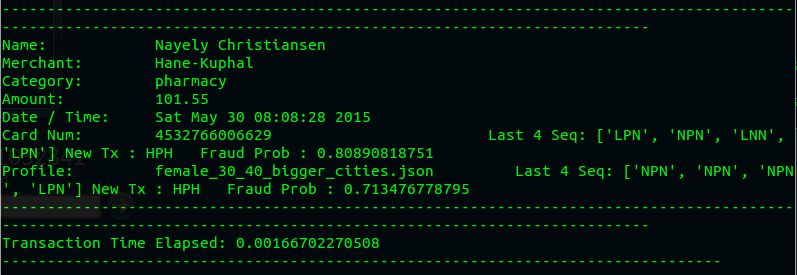
As an example, I’ll be using this set of 3 transactions to test with (these will
probably not work for you, you will need your own from the .csv files!).
503-93-1233|4532766006629|Nayely|Christiansen|F|49384 Lindgren Pike|Miami|FL|33173|25.6992|-80.3618|1737737|Solicitor, Scotland|1980-10-19|702946979935|female_30_40_bigger_cities.json|34c29e83abf02ab35193c9a8ac83a73f|2015-05-30|13:08:28|1432991308|pharmacy|101.55|Hane-Kuphal|26.1255879335|-79.9520692759

503-93-1233|4532766006629|Nayely|Christiansen|F|49384 Lindgren Pike|Miami|FL|33173|25.6992|-80.3618|1737737|Solicitor, Scotland|1980-10-19|702946979935|female_30_40_bigger_cities.json|5dbcfcf8dc14d53e9b154a019da7ea8d|2014-11-16|20:39:14|1416170354|grocery_pos|109.98|Nienow-Hagenes|25.6434625333|-79.5974986159

503-93-1233|4532766006629|Nayely|Christiansen|F|49384 Lindgren Pike|Miami|FL|33173|25.6992|-80.3618|1737737|Solicitor, Scotland|1980-10-19|702946979935|female_30_40_bigger_cities.json|ad77f647d51c64c82d195d76fb86c252|2015-03-13|20:19:27|1426277967|entertainment|7.27|Marquardt Group|25.6657002622|-79.7687990311
Now that we have sample transactions saved, we’ll inialize the local Kafka
zookeeper service, start the Kafka server and create our message topic (note
that topics are only created once, while zookeeper and kafka server can be
stopped / started multiple times if you wish). The ampersand (&) launches these
services into the background. If you receive additional server-related text
after executing the command, hit enter to return you to the terminal prompt.
# Start Zookeeper
sudo /opt/kafka/bin/zookeeper-server-start.sh /opt/kafka/config/zookeeper.properties &

# Start Kafka Server
sudo /opt/kafka/bin/kafka-server-start.sh /opt/kafka/config/server.properties &

# Create a topic
sudo /opt/kafka/bin/kafka-topics.sh --create --zookeeper localhost:2181 --replication-factor 1 --partitions 1 --topic cc_stream_tx
Now let’s execute the Sparkov listener program.
pyspark transaction_listener_AWS.py
Since this program listens for transactions, we’ll need to let it run and start
a new connection to our name node on AWS.
From your local PC, open a new terminal / shell and let’s reconnect to AWS.
ssh -i ~/.ssh/SparkCluster.pem hadoop@ec2-52-91-154-39.compute-1.amazonaws.com
Once we’re connected to AWS again, let’s open a Kafka producer session to paste
our transactions (saved above) to the listener program. (At this point you
probably want to resize your two terminal windows so you can see them both at
the same time!)
sudo /opt/kafka/bin/kafka-console-producer.sh --broker-list localhost:9092 --topic cc_stream_tx
Be careful to not send any accidental keypresses or other input into this
window. All input will be sent to the Kafka listener, and if the listener does
not receive a valid transaction, it will crash and you’ll need to restart it.
Now copy a single transaction to your clipboard from above, and paste it
into the producer window. Depending on how your text was copied/pasted, you
may need to hit enter after pasting the transaction line into the producer
window.
If all goes well, you should see output in your consumer window, similar to the
following (though your transaction details will be different).
You may paste other transactions as desired, but at this point you have
successfully configured and tested the entire process. If you wish to ‘stream’
transactions, you can exit out of the producer window (CTRL-C) and send a
transaction file as input similar to the following command.
sudo /opt/kafka/bin/kafka-console-producer.sh --broker-list localhost:9092 --topic cc_stream_tx < your_file_of_transactions_here.csv
Please note that the listener is extremely sensitive to invalid input. You
cannot have a blank line at the end of any input file, and any unexpected fields
or values may crash the listener.